Parallel Perspective
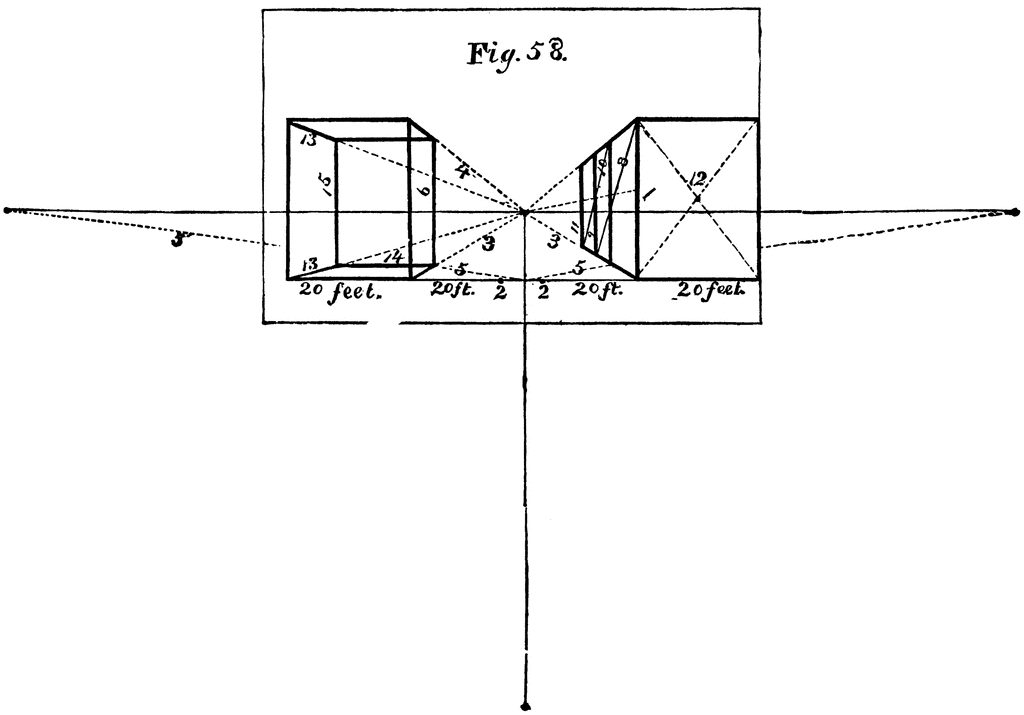
Two upright oblong figures are here represented in parallel perspective. They may be imagined to resemble the sides and fronts of houses, or their blank walls. One of the figures has two others attached to it of equal dimensions; and these additions might be similarly multiplied to any extent, by the numbers, 7, 8, 9 and 10, in the followig rules. 1) Lines forming to complete fronts of two separate and detached oblongs. 2) The geometrical scale at the base, marked twenty feet. 3) The ground lines of the fronts running to the vanishing point. 4) The top lines tending to vanishing point. 5) Lines from the geometrical scale, to the points of measurement, determining the perspective depths of the oblongs. 6) Perpendicular lines raised at the intersection of the lines 3 and 5, and giving the farthest upright corner lines of the oblongs. The two figures will thus be completed. The remaining lines inserted in the figure are intended to give two other oblongs (or rather their retiring sides) attached to the first, and supposed to be of the same dimensions. They are determined first by finding the centre 7 of the near corner line 1. From 7 a line is drawn to the vanishing point. A line marked 8 is then drawn from the near extremity of 1 through 6, where it is cut by 7; at its intersection with the bottom line 3, the perpendicular line 9 is raised, and another oblong front is completed. A line 10 is drawn, and determined as the line 8 was, from the top of 6, and by crossing the lines 7 and 3. The lines 13, 14, and 15, are inserted merely to show the inner side and back of the other oblong, as they would be seen were the object made of glass. Thus 13,13 are lines for the top and bottom of the back; formed by drawing them to the vanishing point; 14,14 are the top and bottom lines of the farthest side, found by straight lines being drawn from both ends of , until they meet 13,13; at which point of meeting the upright corner of the oblong are completed.
Galleries
Perspective DrawingSource
How to Draw and Paint (New York: Excelsior Publishing House) 111
Downloads
2400×1678, 203.4 KiB
1024×715, 30.1 KiB
640×447, 16.7 KiB
320×223, 6.9 KiB