As the name suggests, Automator is a program included with Mac OS X that automates common tasks. Automator makes it possible for teachers to create packaged applications that students with a disabilities can double-click to perform a series of tasks on their computers. This can save time and also help students who have limited motor skills.
- Automator Video Tutorial
- Video Tutorial: Bigger Version (.mov, 5 MB)
- Directions (HTML)
- Print Directions (Tagged PDF)
To create a simple Automator Application:
- Launch Automator from the Applications folder.

- Select a template from the Template Chooser. For this example, I’ll choose the Application template. This creates a packaged application students can double-click to perform a series of tasks.
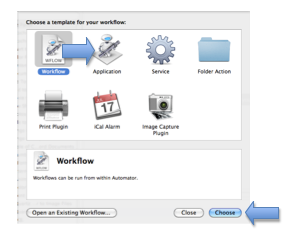
- Click Choose at the bottom of the window.
- On the left side of the Automator window, choose a program from the first column and an action (the task you want to perform) from the second column.
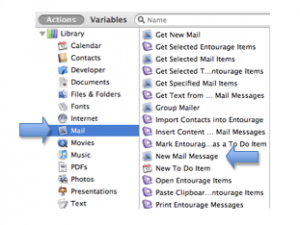
- Drag the desired action to the column on the right side of the window.
- Enter any information you want to be included by default in the application. For this example, I will enter an email address I want to add to each email by default.
- Choose File, Save As.
- Enter the desired name for the application and make sure the Format is set to Application.
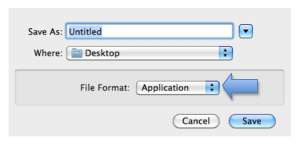
- Choose Save.
With our example application, an icon will be created at the save location (I chose the Desktop for ease of access). When a student double-clicks the application, a new email will be created with the recipient address already entered. This is much easier for a student with limited motor skills than choosing File, New Message and entering the address manually.