NOTE: As of March 16, 2016, Google ceased to support Picasa and encouraged users to migrate to Google Photos. The Picasa application will continue to function, however, and can still be used by those who prefer it. We are maintaining the Picasa posts within TechEase because we find that many people are still using the application and come to the TechEase site looking for the specific help we offer.
To view your pictures as a slideshow in Picasa, select an album or label and then click on the Slideshow button at the top of the Picasa window.

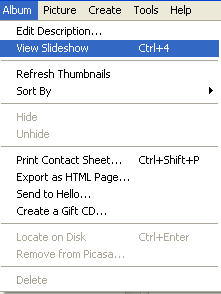
You can also use the keyboard shortcut Control + 4 or select Album > View Slideshow from the menu bar.
To access slideshow controls as the slideshow plays, click on the space bar on your keyboard or move your mouse.

These controls allow you to pause the slideshow (by clicking on the play button so that is it not selected) or move to the next or previous picture.

You can also use the rotate buttons to change the orientation of a picture, or click on the star button to assign a star rating to the currently displayed picture.

The plus and minus buttons on the right side of the control bar can be used to increase or decrease the duration of each slide.

You can exit a slideshow by pressing the Escape (Esc) key on your keyboard or by clicking on the Exit Slideshow button.

You will then be returned to the main Picasa window.
To share a slideshow with others, you have to create a Gift CD. First, insert a blank CD-R or CD-RW into your computer’s writeable drive (your “cd burner”). Next, open up Picasa and click on the Gift CD button in the toolbar.

On the Create a Gift CD screen, select the album or folder that has the photos you want to share as a slideshow by placing a checkmark next to its name in the Library.
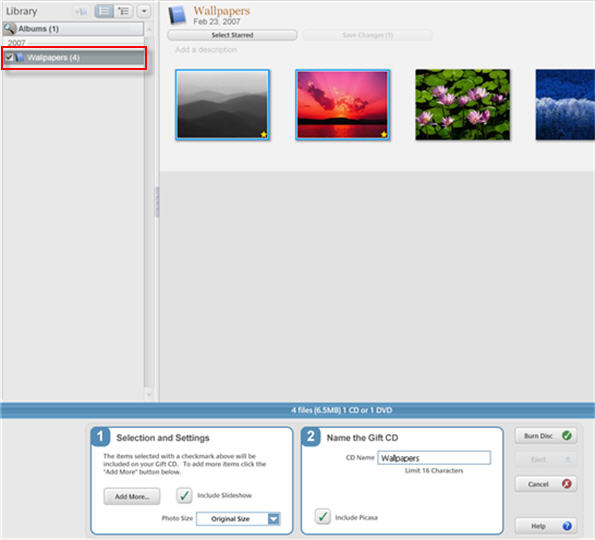
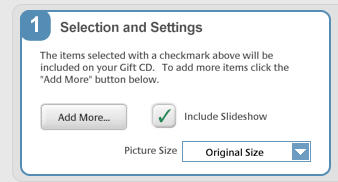
Under Step 1, you can click on the Add More button to display the other folders and albums in your library so that you can select them using checkmarks. To display the photos as a slideshow on the other person’s computer, you need to make sure the box next to that option is checked under Step 1. Finally, choose a size for your pictures using the drop-down menu.
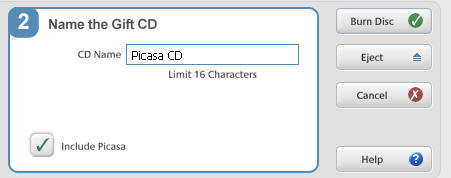
Under Step 2, provide a name for your CD and click on the Burn Disc button to create your CD. By default, a copy of the Picasa program will be included on the CD, but you can uncheck that option if you prefer. The CD will still include a PicasaCD player to display the slideshow on the other person’s computer.