In this tutorial, you will learn how to use Adobe Dreamweaver to add an accessible data table to a web page.
- Accessible Tables Video Tutorial (CC)
- Video Tutorial: Larger Version (.mov, CC)
- Directions (HTML)
- Print Directions (Tagged PDF)
To create a table in Dreamweaver:
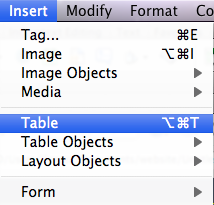
- With your Dreamweaver document open, choose Insert, Table.
- Enter the desired number of columns and rows into the appropriate text fields in the Table window, and make sure the Table width is set to percent.
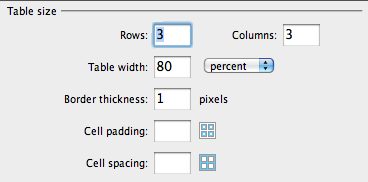 This will make it possible for the table width to change depending on the size of the browser window. The other options under table size will determine the appearance of the table:
- Border thickness: will determine the size of the border around the table as well as between the table cells.
- Cell padding: will add space between the text in each cell and the cell’s border.
- Cell spacing: will add space between the table cells.
- Under Header, choose whether you want to add headers to the columns, rows, or both.
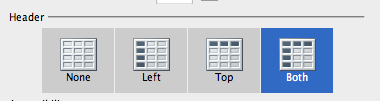 When you add a header, Dreamweaver will automatically add a Scope attribute to that header. Screen readers can use the Scope attribute to let the user know whether a header refers to a column or a row.
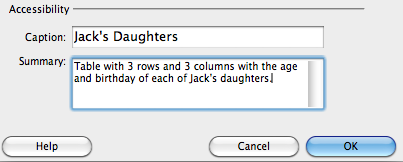
 - Use the Caption text box to enter the text for a label that will appear above the table.The Summary attribute is used to provide the user with some information about the structure of the table (such as the number of rows and columns) and a summary of the information that will be presented in the table.
- When you’re finished entering the table information, choose OK to add the table to your Dreamweaver document.
- To save the changes to your document, choose File, Save. You can preview the table by choosing File, Preview in Browser.