NOTE: As of March 16, 2016, Google ceased to support Picasa and encouraged users to migrate to Google Photos. The Picasa application will continue to function, however, and can still be used by those who prefer it. We are maintaining the Picasa posts within TechEase because we find that many people are still using the application and come to the TechEase site looking for the specific help we offer.
You will find two types of controls you can use to fix colors in Picasa. The first type is found in the Basic Fixes tab and consists of one-click fixes that automatically correct the color or exposure in an image for you. The other type of color correction is found in the Tuning tab of the editing window and gives you a little more control over how color is corrected by allowing you to use sliders to make gradual adjustments.
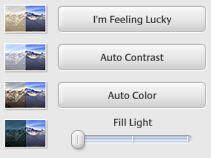
To automatically correct color or exposure in your image, select the image in the Lightbox and double-click on it to open the editing window. Next, click on Auto Color in the Basic Fixes tab to automatically balance colors in the image, or on Auto Contrast if you want to improve the contrast. The I’m Feeling Lucky button will correct both color and contrast in one step for you. The Fill Light slider allows you to increase the brightness of the foreground in your pictures. This is useful if you take a picture with a background that is too bright.
If you want more control, click on the Tuning tab to access a set of sliders that will allow you to make more gradual changes.
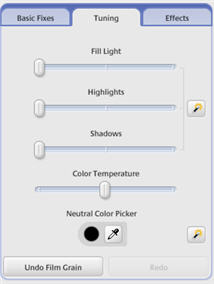
With the Fill Light slider, you can add light to the foreground until the image is more balanced. The Highlights slider allows you to either brighten or darken only the bright spots (or highlights) in your picture. The Shadow slider allows you to add more shadows to a picture. The changes you make with this control only affect the darkest parts of the picture (the shadows).
With the color temperature button, you can make your picture appear warmer by adding more yellow if you drag the slider to the right or cooler by adding blue if you drag the slider to the left. The Neutral Color Picker allows you help Picasa’s color correction by using the color picker to select a neutral gray in the picture.
Picasa includes a histogram which shows you the color information of your image as you perform changes in the Tuning tab. The histogram can be accessed by clicking on the “beanie” button in the picture tray while you have the editing window open.
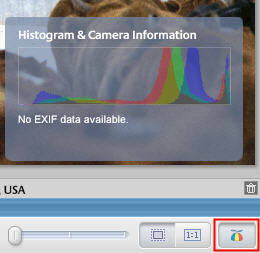
The histogram will show you the color distribution in the three channels (red, blue, green) that combine to add color to your image. The histogram will also show you information about the camera that took the image and the settings that were used.
A good rule of thumb is that you should try to end up with a histogram that has information spread out. A histogram with information bunched up in the middle is indicative of a washed out image that lacks contrast, while one with more information at one end is indicative of an image that is either overexposed (too bright) or underexposed (too dark).
You can undo any changes you make in the Tuning tab at any time by clicking on the Undo Tuning button.