VozMe and Read The Words are two browser-based text to speech services that may be helpful for auditory learners, or for anyone who can benefit from content presented in multiple formats.
- Browser Text to Speech Video Tutorial (CC)
- Video Tutorial: Larger Version (.mov, CC)
- Directions (HTML)
- Print Directions (Tagged PDF)
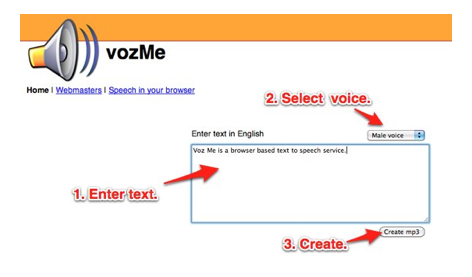
To create an MP3 file with VozMe (https://www.vozme.com):
- Enter your text in the text area.
- Select a voice (male or female) from the menu above the textarea.
- Choose Create mp3.

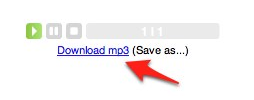
- Use the playback controls on the popup window to pause, stop, or replay the speech. To save a copy of the MP3 file to your computer, right-click the link below the playback controls and choose Save As.

To use the text to speech service at Read the Words (https://www.readthewords.com):
- Enter your text in the textarea at the top of the page.
- Select your voice (male or female) from the menu below the avatar.
- Choose Read. The avatar on the right side of the page will read the text you entered.

By signing up for a free account, you will have access to additional features on the site, such as:
- downloading an MP3 file of your recording to your computer.
- uploading a document with your text (the supported formats are .txt, .doc, .pdf, and .html).
- reading web pages or RSS feeds with the avatar.
- customizing the appearance of the avatar.
- choosing from a longer list of voices.
To created a recording from an uploaded document:
- Log into the site and choose Convert Files under Services.
- Enter a name for the recording in the Save As text box.
- Click on Choose File and browse to a text document on your computer, then choose Open.
- Select a voice from the pulldown menu, and adjust the reader speed with the slider.
- Choose Create Audio File.
- On the My Library screen, scroll down to see a list of your recordings, then click the Play button next to a recording to have the avatar read it.

The steps for recording a web page or RSS feed are very similar, but instead of selecting a file on your hard drive you will enter the URL (web address) of a web page or the Feed URL for an RSS feed. With RSS feeds, you will be able to select how many items from the feed will be included in the recording.
Once your recording has been created, you can download it to your computer by clicking the appropriate icon (down arrow) under Downloads in your My Library page.
To share a recording on your blog or website:
- Click the Embed icon for the recording to be shared.
- Make sure the correct recording is selected from the pulldown menu.
- Select an avatar using the pulldown menu on the right side of the screen.
- Copy and paste the appropriate embed code.