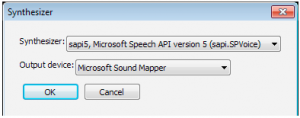
One of the first things you will want to do after you install NVDA is change the synthesizer. NVDA ships with eSpeak, but the Microsoft Windows 7 synthesizer offers a much better voice.
- NVDA Synthesizer Settings Video Tutorial
- Video Tutorial: Bigger Version (.mov, 5 MB)
- Directions (HTML)
- Print Directions (Tagged PDF)
To change the synthesizer used by NVDA:
- With NVDA running, open the NVDA menu by pressing Insert, N.
- Choose Preferences, Synthesizer. If you’re using the keyboard, press the Down Arrow once to select Preferences, then the right arrow to open the Preferences submenu. From there, press the Down Arrow to select Synthesizer and press Enter.
- When the Synthesizer window opens, select sapi5, Microsoft Speech API version 5 from the Synthesizer menu. To make a selection with the keyboard, press the Tab key until the focus is on the Synthesizer menu, then use the Up and Down Arrow keys to hear the options in that menu.

- Once you’ve made your selection, choose OK to close the Synthesizer window and save your changes. To do this with the keyboard, press the Tab key a few times until the focus is on OK and press Enter.