Most screen readers support a keyboard shortcut for navigating the content on a web page using headings. This feature can provide additional navigation for people with visual impairments who use screen readers to browse the web. Headings also separate the content on a web page into more manageable sections for people with cognitive disabilities.
- Headings Video Tutorial (CC)
- Video Tutorial: Larger Version (.mov, CC)
- Directions (HTML)
- Print Directions (Tagged PDF)
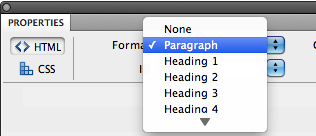
To add a heading to a web page in Dreamweaver:
- Select the desired heading text in your Dreamweaver document.
- Make sure HTML is selected in the Properties Inspector.

- Using the Format pulldown menu, select a heading style for the selected text. To create a logical document structure, you should start with heading 1 and proceed in order (Heading 2, Heading 3, etc.) for each level of subheadings.

- To save your changes when you’re finished adding headings to your document, choose File, Save.
With the free NVDA screen reader available for Windows, pressing the H key on your keyboard will take you to the next heading on a web page.
With VoiceOver, the screen reader included with Mac OS X, you can use the Web Rotor. This is a special gesture supported by the trackpad on newer Mac laptops and the Magic Trackpad. To use the Web Rotor:
- Using your thumb and index finger, turn an imaginary dial on the trackpad to select different elements on the web page, including headings.

- When Headers (VoiceOver’s name for headings) are selected in the Web Rotor, flick down on the trackpad with one finger to select the next heading on the web page. Flicking up with one finger will select the previous heading.