There are many different ways to obtain images you can use in your projects.
- Digital camera: one of the easiest ways to get pictures of your students is to take snapshots using a digital camera. You can then connect the camera directly to your computer using a USB cable, or you can remove the memory card used by the camera and use a USB card reader to access the pictures. The USB card reader will make the memory card appear as a drive in My Computer.
- Scanner: You can scan not only images, but other objects such as flowers that you can then use in your projects once they are in digital form in your computer. Even the cheaper scanner models sold today can produce scans at a fairly high quality. Most scanners sold today connect to the computer using a USB connector. Flatbed scanners are very popular and easy to find at any computer store. They work in a similar way to a copier. You open the lid, place the document on the glass, and press a button to start the scan. There are also film scanners designed specifically for scanning slides or negatives. If you plan to use the scanner primarily to scan documents, a flatbed scanner should fit your needs just fine.
- Free clip art and stock photography websites: There are many websites where you can find free images to use in your projects. A good place to start for clipart is FCIT’s Clipart ETC website. You can use up to 50 images from this site in a single non-commercial project without requiring permission. The Clipart ETC website has more than 8,500 items to choose from, in a variety of sizes and formats. If you are doing a project that requires photos with a Florida theme, you may want to check out the Exploring Florida section of the FCIT website. You can use up to 20 photos from this section in any individual non-commercial project. There are many other free stock photography websites. Two popular ones are Stock.xchng and Morguefile. These sites often catalogue images uploaded by amateur photographers and make them available with no copyright restrictions.
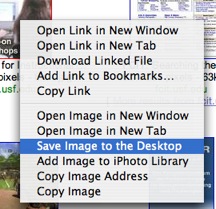
- Other websites: Your can right click on any image you find on a website and select Save Image to the Desktop (or a similar command depending on which web browser you use) to store it on your hard drive.

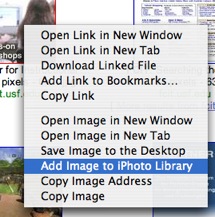
In some versions of OS X you can also import the image directly into iPhoto while you’re visiting a webpage by control-clicking (or right-clicking) on it and selecting Add Image to iPhoto Library.

Note that if you plan to use the image on any type of public space such as a website you will need to get permission from the person who holds the copyright for the image you want to use. If you are just using the image in a presentation for your students, copyright should not be an issue. A good place to find images is the Image section of the Google search engine.