It is easy to share files between Windows computers and Mac computers using TCP/IP, an industry standard networking protocol.
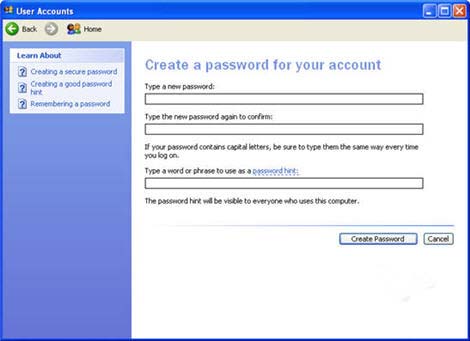
Before you can connect to a Windows computer from a Mac you must know some information about how your Windows computer is set up. First, you must find out what IP address your Windows computer has been assigned. The easiest way to do this is by going to Start, Run and typing cmd, then ipconfig /all. This will show your computer’s unique IP address which you will know to connect to it from a Mac. Two other things need to be configured on your Windows computer to make sharing with a Mac possible: file and printer sharing must be enabled, and the account you will use to connect to the Windows computer must have a password set on it. To set a password on a user account in XP, go to the Control Panel (Start, Control Panel) and select the User Accounts applet.
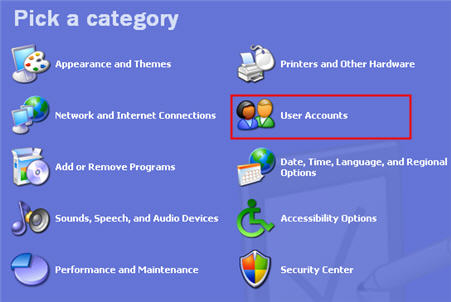
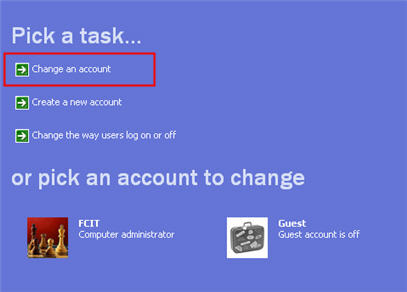
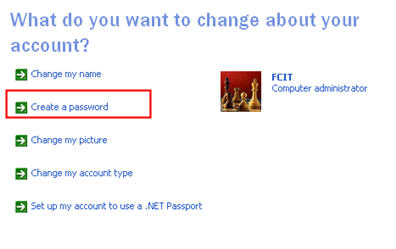
Select Change an account, then choose the user account you want to use when you connect to the Windows computer, then choose Create a Password.
Once you have configured these two options, you must share a folder on the Windows computer. To connect to this shared folder from the Mac, make sure you are in a Finder window and choose Go, Connect to Server, then type your Windows computer’s IP address in the following format: smb://ipaddress.
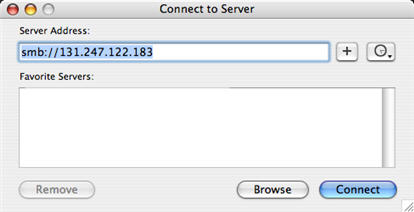
Click on Connect. A window will pop up where you can select from the shared folders on the Windows computer. Make your selection using the pulldown menu and click on OK. You will then have to enter the user name for an account on the Windows machine and the password for that account before you can connect by clicking on OK. Once a connection has been made, the shared folder will be mounted on the Mac’s desktop (a shortcut to it will be created on the Mac’s desktop).
To connect to the Mac from a PC, you must know the short version of a user name on the Mac and have Windows Sharing enabled in the System Preferences. To find out the short version of a user name on the Mac, open up the System Preferences window from the Apple menu and select Accounts, then make sure the Password tab is selected. The short version of the user name will be listed on that tab.
https://etc.usf.edu/te_win/files/i/pcmacsharing6.png
To enable Windows sharing, choose System Preferences from the Apple menu, then Sharing and make sure a check mark appears next to Windows Sharing. If Windows Sharing is not already started, click on the Start button to enable it. You will then see the address you need to connect to the Mac from a Windows computer at the bottom of the Sharing window.
https://etc.usf.edu/te_win/files/i/pcmacsharing7.png
To connect to the Mac, you can open up an Explorer window on the Windows computer and type in the address for the Mac share (the address is in the format: \\ipaddressofthemac\shortusername).

You will be asked to enter a password for the account you are using to connect to the Mac before you can connect. The home folder for the user name you used will then be displayed in the Explorer window.