MovieCaptioner is a program from Synchrimedia (www.synchrimedia.com) that makes it easy to add closed captions to QuickTime videos on the Mac.
This tutorial covers how to install and configure MovieCaptioner.
- Setting Up MovieCaptioner Video Tutorial
- Video Tutorial: Larger Version (.mov, 5 MB)
- Directions (HTML)
- Print Directions (Tagged PDF)
The process involves three steps: installing MovieCaptioner, installing a plug-in for QuickTime, and making sure you have the correct version of QuickTime Player required by MovieCaptioner installed on your computer.
Install MovieCaptioner
This is the easiest step of the three. To install MovieCaptioner:
- Go to www.synchrimedia.com and select Download Demo to download a 14-day trial of the program. This will allow you to test the program on your computer to make sure it meets your needs before you buy it.
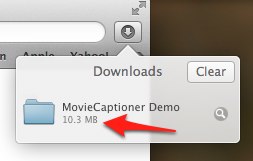
- The MovieCaptioner Demo will download as a compressed zip file (.zip). Locate the zip file in your Downloads folder and double-click it to expand its contents. You will then see a MovieCaptioner Demo folder.
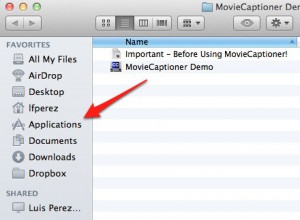
- Drag the icon for the MovieCaptioner Demo application from the unzipped folder into your Applications folder to complete the install. You can also copy and paste the MovieCaptioner Demo application from the unzipped folder to the Applications folder if you are unable to do drag and drop.
- Once you have tested the program on your computer, you can purchase a single user license at the Synchrimedia website for US $99.95. After you purchase your license, you will receive an email with a link that will allow you to download the full version of MovieCaptioner. You can then remove the demo version of MovieCaptioner from your computer (drag its icon to the Trash), and replace it with the full version of the application downloaded from the email sent by Synchrimedia.
Install the QuickTime Closed Captions Plug-In
To install the QuickTime plug-in needed by MovCaptioner:
- Visit the Mac OS X Reference Library page for ClosedCaptionImporter.
- Once you’re on the page for ClosedCaptionImporter, select Download Sample Code.
- Open the downloaded folder and copy the ClosedCaptionImporter.component file to your Library/QuickTime folder. You can copy the file by right-clicking on it and choosing Copy or by using the keyboard shortcut Command, C. To paste the file, right-click inside the destination folder and choose Paste or use the keyboard shortcut Command, V.

Note: to access the Library folder in OS X Lion, open a Finder window, choose Go, Computer and you will see an icon for your hard drive (Macintosh HD by default). The Library folder will be visible when you click on your hard drive’s icon to open it.

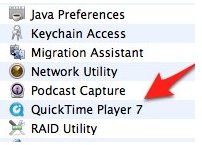
Install Quicktime Player 7
MovCaptioner only works with an older version of QuickTime Player, QuickTime Player 7. This is the version of QuickTime found in your Utilities folder.
If you do not have QuickTime Player 7 installed on your computer, you can install it from your Mac OS X operating system install disc. The installer for Quicktime Player 7 should be in the Optional Installs folder of your OS X install disc.